How is Glass Mosaic Installation?

How is Glass Mosaic Installation?
Glass mosaics are indispensable products of indoor and outdoor spaces. Glass mosaic tiles, which are frequently preferred by architects, have different stone sizes such as 28mmx28mm, 48mmx48mm, 25mmx50mm, 38mmx38mm and are produced with 30cmx30cm mesh. In this way, they are applied very practically. These products, which add architectural richness to your walls, allow you to create decorative wall designs. By going through different processes during the glass mosaic production phase; They are produced in different models such as solid glass mosaic, crystal glass mosaic, metal-looking glass mosaic, and 3D glass mosaic. All glass mosaic models are applied with the same method, we have arranged these steps for you below. How to Install Glass Mosaic? Check out the steps below to answer the question.


Glass Mosaic Steps of Installation
- First of all, all tools and equipment should be prepared cleanly for glass mosaic installation.
- You should apply the glass mosaic mesh on the cement-fixed wall surface. The aesthetic application cannot be made on uneven surfaces.
- The mortar prepared for the application must be prepared in a clean container.
- Clean water must be used for the mortar. Thus, a better quality mortar is obtained. The amount of water should be added according to the instructions written on the back of the glass mosaic adhesive mortar.
- Adhesive, which absorbs water well, should be mixed continuously to obtain the right consistency. Thus, you can obtain a homogeneous mortar. The homogeneous mortar is left to rest for about 10 minutes. Then the mortar is mixed again and obtained in its final form.
- The prepared adhesive can be applied to the surface to be applied in a thin layer with a notched trowel.
- Since glass mosaics are produced with mesh, it provides ease of application. We recommend that you apply the adhesive to the nets as well. This will extend the life of the product.
- In flat glass mosaic models, if you start to place the nets from the lowest corner of the wall to be applied, the nets will be arranged more smoothly and adjacently. In patterned glass mosaic models, you will need to place them in the order specified behind the nets.
- After placing the nets on the wall, if you tap them lightly with a wedge, the nets will be placed on the wall surface without any air gaps.
- After all the nets are placed, they are left to dry for approximately 12 hours. After all the glue is completely dry, you can first wet the kraft paper on the surface of the mosaics with a brush and then gently remove it from the stones.
- Since glass mosaics are sensitive products, joint fillings should be checked slowly. You can apply glue or joint filler to the places where you see gaps. You should decide on the color of the grout based on the color of the mosaics.
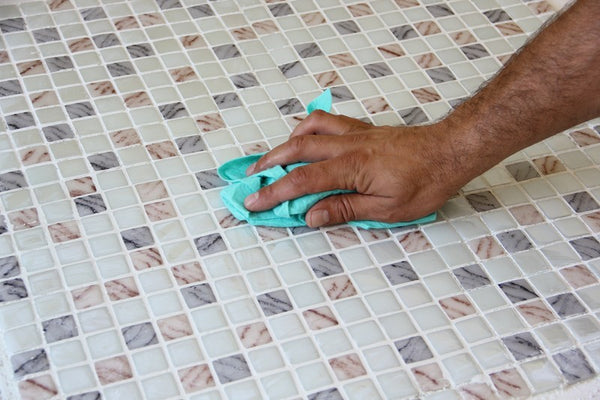
- The last step is to gently wipe the mosaics with a damp cloth. Now you can enjoy your stylish walls.